 Call lists
By default, you have 2 call lists1:
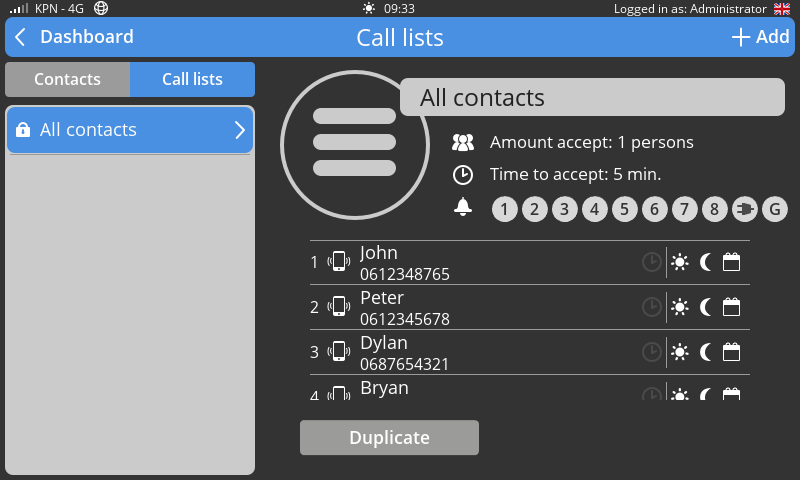
- All contacts: This automatically generated list includes all contacts with a phone number. The dialler links this call list to all inputs by default, so the alarm always reports out.
- Administrators: This automatically generated list includes all contacts with the authority Administrator and/or Coordinator whose phone number has been entered. The dialler uses this call list in the event of the system failure No one scheduled.
In addition to these standard call lists, you can create your own call lists to suit your situation. For example, you might create a group of contacts within a discipline in the company who handle their own type of disruptions, such as Cultivation or Technology.
To control how the dialler handles alerts, link a call list to an alarm input. In an emergency, the relevant discipline within the company will then receive the alert. See Alarms | Configuring inputs for further explanation on linking a call list to an alarm input.
Creating a call list
- From the dashboard, go to
Contacts. - Click the
Call listsbutton. - Click
Addto create a new call list and complete the fields below. - Click
Apply.
Explanation of input fields
(Left-hand side)
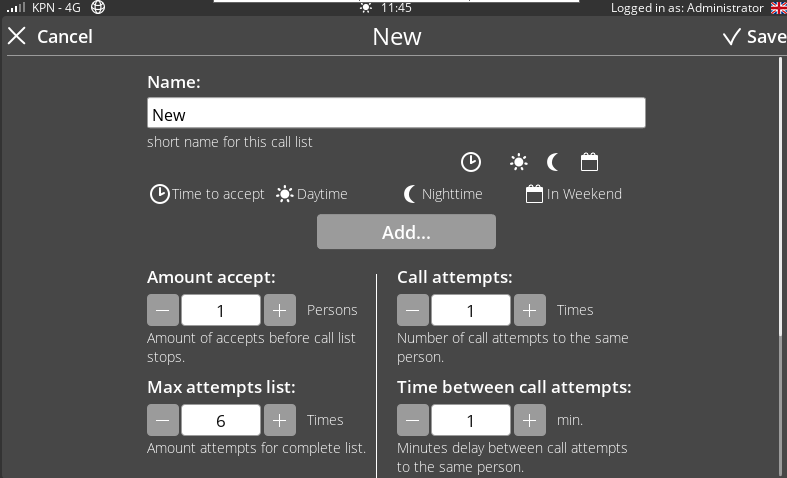
Name
Enter a clear name for the call list, for example: Urgent Nighttime, Cultivation, or Technology.
Number of acceptances
Increase the number of acceptances if you want several different people to receive the alarm message before the dialler stops alerting, for example in the case of very urgent alarms.
Max. attempts list
Set the number of call attempts for the entire call list.
Time to accept 
The time to accept is the period in which the contact can call or text back to the Octalarm alarm dialler. The default is 5 minutes and this applies to everyone in the list who has time to accept ticked.
Good to know: To call back, dial the mobile phone number of the Octalarm alarm dialler. You will see this number when you perform a test call (see Contacts | Add and edit: Run test call).
Call attempts and time between these call attempts
For each call list, you can set the number of call attempts and the time between call attempts to the contacts in the list. The number of call attempts and the wait time apply to everyone in the list.
(Right-hand side)
Add contacts
- Click
Add. - Select a contact.
- Select the desired call medium.
- The Time to accept is automatically ticked for app, Email, SMS, and pager. When you use these call media as notifications, you can untick this option.
Note: If you untick the time to accept for these call media, the dialler accepts the alarm immediately after sending it. For critical alarms, we do not recommend this, as you cannot assume that the recipient has actually noticed the alarm.
- The availability within the weekly schedule (Daytime
 / Nighttime
  / In the Weekend
  ) is automatically ticked for all time slots. If you untick availability, the contact will not receive alarms during that time slot. See Settings | Appearance | Schedule for further explanation on how to set the times and weekend days.
Note: If you untick all contacts for a certain time slot, the dialler only alerts locally (assuming the buzzer of the corresponding input is enabled). The dialler will send out alarms again only at the next time slot where a contact is marked as active. Make a conscious choice when unticking the availability of contacts within the weekly schedule.
Good to know: You can add up to 20 elements to a call list. For example, John voice alert and John app alert each count as one element. If you want to add more than 20 elements, consider taking out a licence for the duty schedule module. With the duty schedule module, if a contact does not accept an alarm, the dialler first calls this contact via all set call media before moving on to the next person. See Duty schedule module for further explanation.
Customising the sequence of contacts in call list(s)
Default call lists: All contacts and Administrators
- From the dashboard, go to
Contacts. - Click the
Call listsbutton. - Select the desired call list.
- Click
Reorder. - Select a contact and drag it to the desired position.
- Click
Save.
Own call lists
- From the dashboard, go to
Contacts. - Click the
Call listsbutton. - Select the desired call list.
- Click
Edit. - Select a contact and drag it to the desired position.
- Click
Apply.
-
Only applicable to Touch and Touch Pro without a duty schedule module licence (DUTY). ↩