Dashboard
Logged out
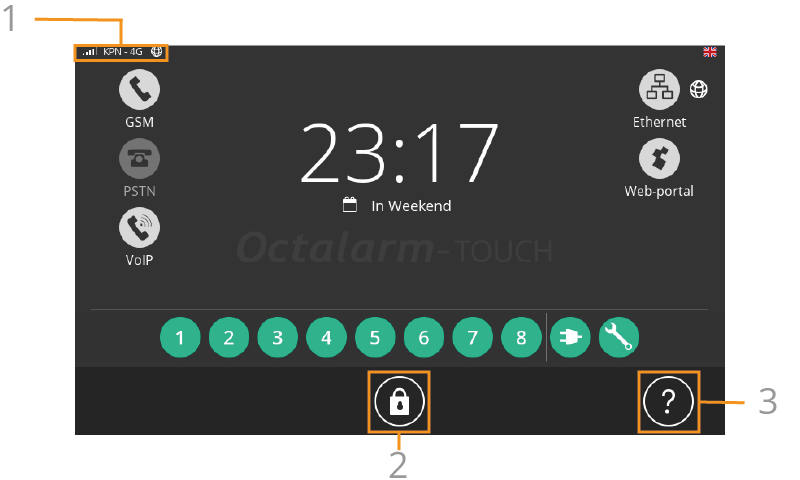
| No. | Description |
|---|---|
| 1 | Login |
| 2 | System information screen |
Login
You can log in in 2 ways:
- Use a linked tag.
Hold a linked RFID tag against the RFID reader (
 ). See Contacts | Add and edit: Linked tag for further explanation on how to link a tag.
 - Log in with a username and password.
- Click the lock icon (
 ).
).
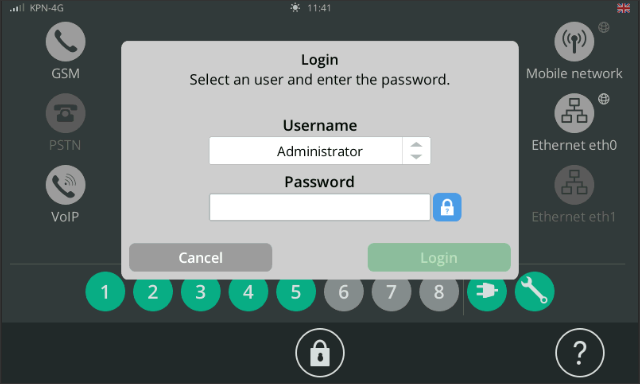
- Select the correct user by pressing the double arrows.
- Enter the password and press the check mark.
- Click the lock icon (
See Contacts | Add and edit for further explanation on how to add a contact.
Forgotten your password?
Note: This functionality is only available when:
- An interface is available for calling and/or Emailing (GSM and/or Ethernet) AND.
- The user in question has set up a telephone number and/or Email address.
- Select the desired user.
- Press the lock icon next to the password field.
- Select the call type: Email, SMS or call (depending on the available contact information).
- Press
Send. - Enter the verification code you receive.
- Set a new password.
- Press
Save.
Good to know: If a User has forgotten their password and has not set up a telephone number and/or Email address, an Administrator or Installer can reset the password for this User. See Contacts | Add and edit: Forgotten your password for further explanation.
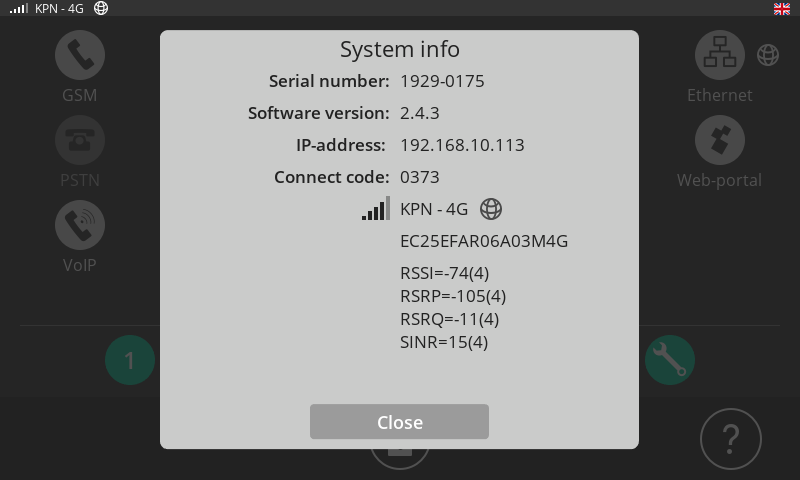
System information screen
Press the question mark icon (![]() ) to open the system information screen. The displayed QR code provides direct access to the table of contents of the online manual.
) to open the system information screen. The displayed QR code provides direct access to the table of contents of the online manual.
Logged in
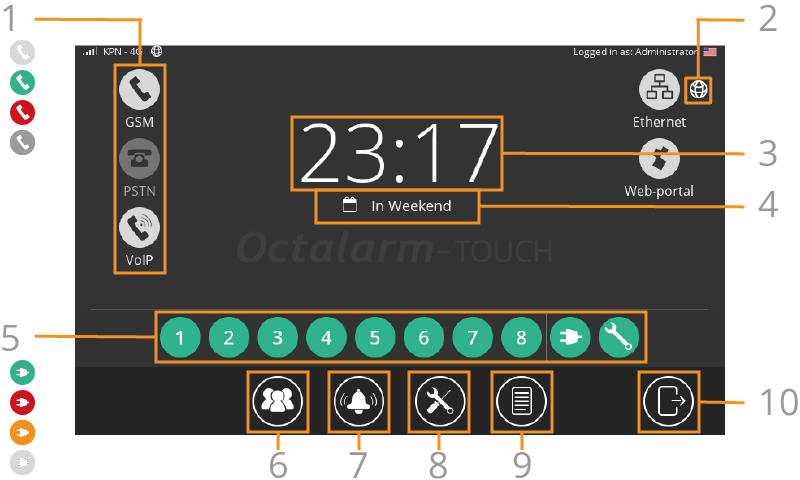
| No | Icon | Description |
|---|---|---|
| 1 | Interface status | |
| Active (grey) | ||
| In use (green) | ||
| Error (red) | ||
| Out of order (dark grey) | ||
| 2 | Remote support enabled | |
| 3 | Current schedule (day | night | weekend) | |
| 4 | Current time | |
| 5 | Network status | |
| Active (grey) | ||
| Error (red) | ||
| Out of order (dark grey) | ||
| 6 | Active internet connection | |
| 7 | Alarm status | |
| Rest (green) | ||
| Active (red) | ||
| Call successful (orange) | ||
| Disabled (grey) | ||
| 8 | Contacts / Call lists or Service groups | |
| 9 | Alarms | |
| 10 | Settings | |
| 11 | Logbook | |
| 12 | Logout |
Extra pictograms
![]()
| No | Description |
|---|---|
| 1 | Disabled alarms |
| 2 | Switch output |
Displaying disabled alarms (for more than 8 inputs)
When you use external IO-modules, Dupline modules, or ARA with linked diallers, there is not enough space on the dashboard to display all disabled alarms with grey icons. In that case, the dashboard shows a separate button as soon as you disable one or more alarms. The button disappears automatically when you enable all alarms again.
The web GUI always shows disabled alarms with grey indicators, even if you have more than 8 inputs.
Switch output
Use this pictogram to switch linked outputs. See Settings | System | Outputs for more information.
Notifications on the dashboard (logged in or logged out)
1. Alarm notification
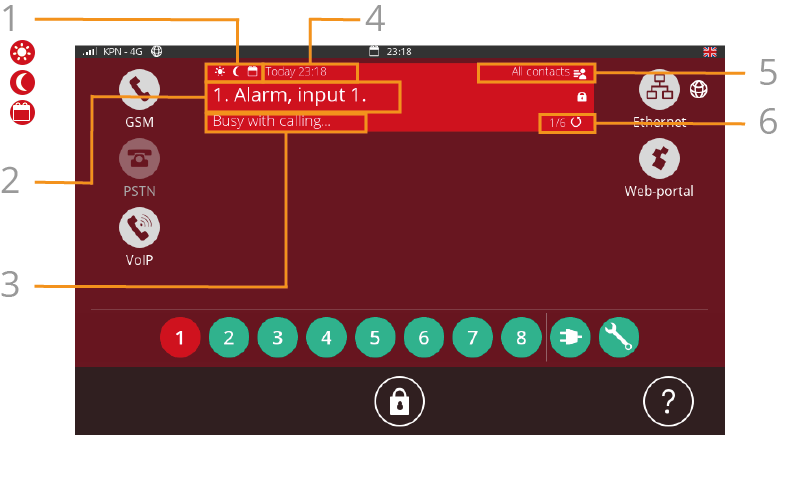
| No | Description |
|---|---|
| 1 | Linked call list or service group |
| 2 | Used interface |
| 3 | Action: Busy calling... | Accepted... | Waiting for... |
| 4 | Device name, name of alarm input |
| 5 | Repetition (number of repetitions / maximum number of repetitions) |
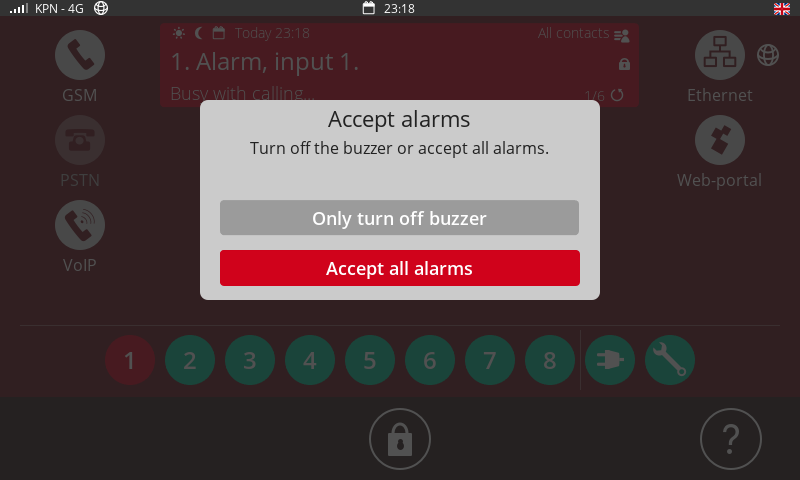
When you click the notification, you have two options:
Only turn off buzzer
This mutes the buzzer. The buzzer is unmuted when the Octalarm alarm dialler records no activity for a set number of minutes.
Accept all alarms
By accepting all alarms, the Octalarm alarm dialler does not start a new call for these alarms until the waiting time between repetitions has expired. See Alarms | Configure inputs: Waiting time between repetitions for more information.
2. Update available
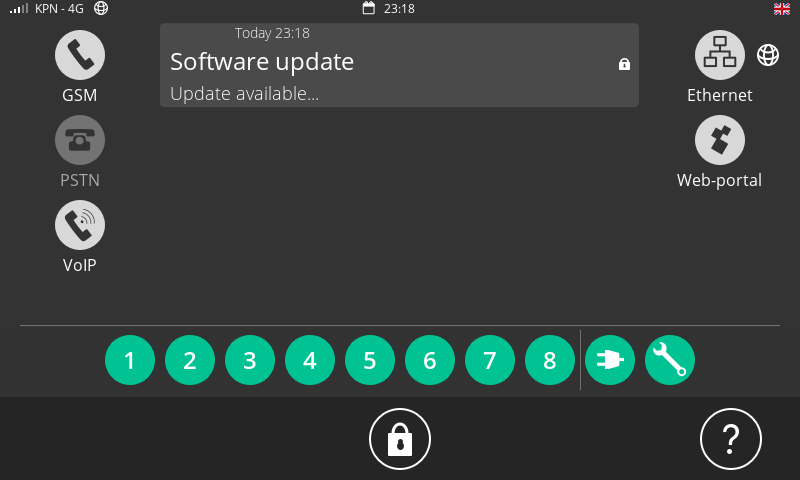
- Press the notification to go to the update menu.
- Start the update.
The update takes a few seconds. The dialler then restarts automatically.
Changing settings
Depending on their permissions, contacts can adjust settings via the Edit button. See Contacts | Add and edit: Authorisation, username and password for more information about permissions.
Customise settings
- Go to the desired menu: Contacts (
 ), Alarms (
 ) or Settings (
 ).
). - Press
Edit(located at the top right or at the bottom of a scroll list). - Change the settings as required.
- Press
ApplyorSave(located at the top right).
Tip: You can also view, create, and edit settings remotely. The available options depend on your user role. See The portal: portal.octalarm.com | Remote setup (global), Remote setup (local) and Adésys Alarm App for further explanation.